

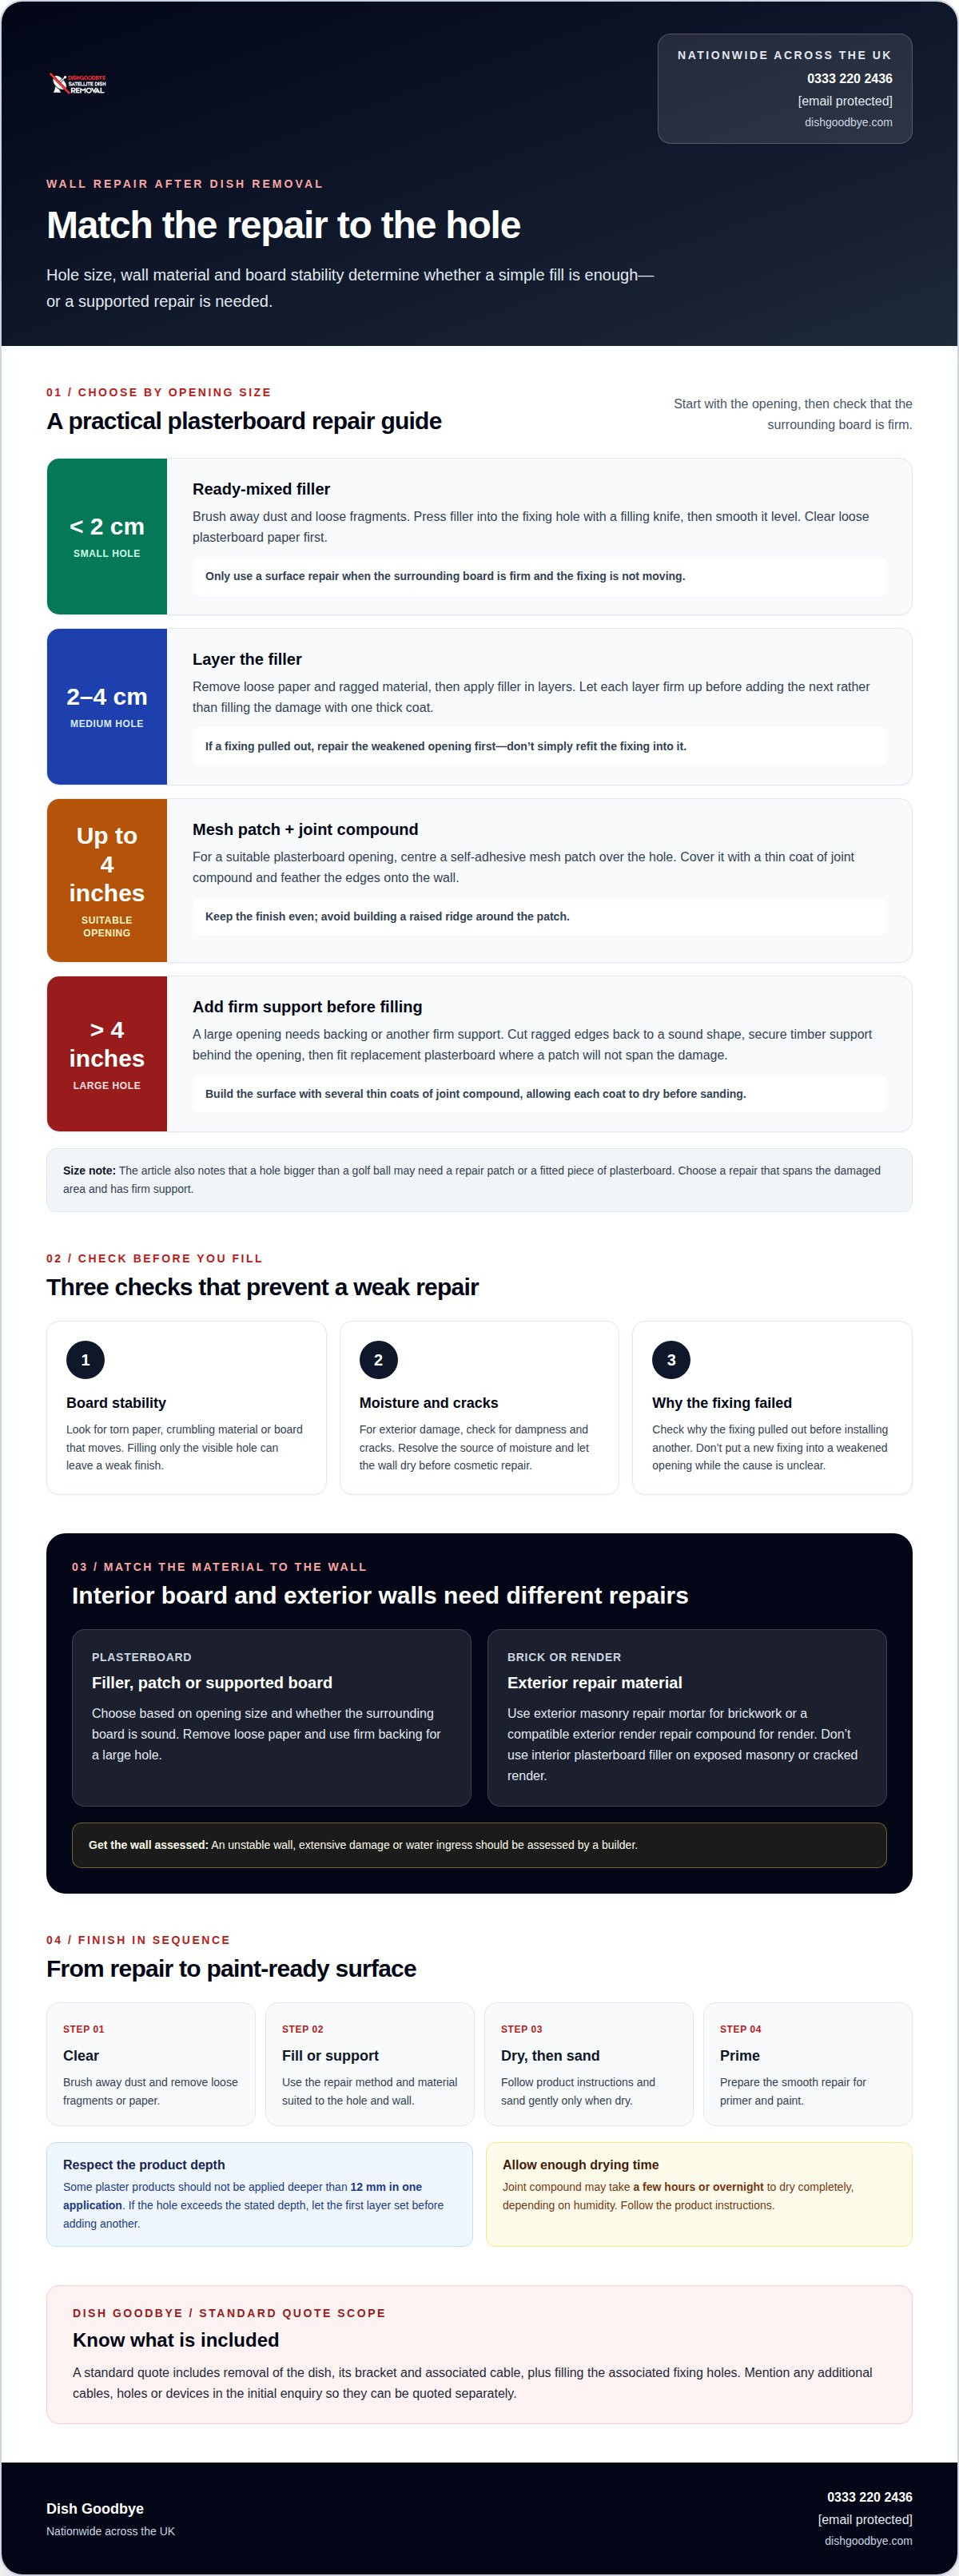
To fix a wall after a failed dish removal, match the repair to the hole: use ready-mixed filler for an opening under 2 cm wide, and a patch or supported plasterboard repair for a larger one.
It’s frustrating when a dish removal leaves ragged holes, crumbling plasterboard or a rough patch. Careful filling, sanding and priming can help leave a smooth surface ready for paint.
This guide explains how to repair small fixing holes and larger damage, match the wall’s texture, and prepare the repair for primer and paint.
Key Takeaways
- Choose a filler or repair method that suits the hole’s size and the wall material.
- For larger plasterboard damage, add secure backing or a repair patch before filling.
- Blend textured finishes carefully, and test the technique on a spare surface first.
- Let repairs dry fully, then sand and prime the surface to help paint look even.
- Find out when professional dish removal and filling of the associated fixing holes can make the job simpler.
How to fill a hole in plasterboard after removing a fixing
Learning how to fix a wall after a failed dish removal starts with checking the hole, the board and the surrounding surface. Clean a small fixing hole and fill it with a suitable product; a wider or deeper break needs a repair with firm support.
Fill Small Fixing and Nail Holes
Press ready-mixed filler into a fixing hole under 2 cm wide, then smooth it level with a filling knife. For tiny nail holes, apply lightweight spackle with a fingertip or putty knife. Clear away loose plasterboard paper first, and don’t cover a fixing that still moves or sits in crumbling material.
- Inspect the opening. Brush dust and loose fragments from the hole, then look for torn paper or a soft, flexible board. A neat fixing mark in firm plasterboard is suitable for a surface repair. If the surrounding board moves, filling the visible opening alone may leave a weak finish.
- Press filler into the hole. Use a filling knife to work ready-mixed filler into the opening, rather than simply spreading a thin layer across its face. For a tiny nail hole, lightweight spackle can be applied with a fingertip or putty knife. Wipe the surrounding wall clean before the material sets.
- Respect product depth limits. Some plaster products shouldn’t be applied deeper than 12 mm in one application. If the hole exceeds the product’s stated depth, allow the first layer to set before adding another. Several controlled coats help prevent a deep void beneath a thin surface skin.
- Let the repair dry before finishing. Follow the product instructions and wait until the filler is dry before sanding. Joint compound may take a few hours or overnight to dry completely, depending on humidity. Sand gently so the repair sits level without scuffing the surrounding plasterboard.
Repair and Seal Dish-Fixing Damage
To understand how to fix a wall after a failed dish removal, first identify whether the damage is in plasterboard, exterior masonry or render. A small hole in sound exterior masonry can be filled at home. For an unstable wall, extensive damage or water ingress, have a builder assess it. For cracked render, remove loose pieces and use a compatible exterior repair material, not interior filler.
- Check for moisture and loose material. Inspect each fixing hole and the surrounding finish for cracks, dampness or crumbling edges. If moisture is present, resolve its source and let the wall dry fully before cosmetic work. Filling over damp material can hide the problem without repairing the surface.
- Seal the exterior opening. Clear loose material from the fixing hole, then fill it with a product suited to the surface, such as exterior masonry repair mortar or render repair compound. Smooth the repair continuously across the opening so rain can’t pass through gaps and reach the wall behind.
- Finish only after the repair is sound. Let the material dry as directed, then check for shrinkage, cracks or low spots. Correct gaps before decorating. A clean, even repair helps protect the wall and gives later primer or paint a firmer base.
Repairing medium and large holes in plasterboard
Medium openings need layered filler; larger breaks need firm support behind the board. First identify why a fixing pulled out.
-
Assess Holes and Pulled-Out Fixings
Inspect the damaged board and remove loose paper before choosing a repair. For a medium hole measuring 2-4 cm wide, apply filler in layers and let each layer firm up. If a dish fixing has pulled out, check whether the board or surrounding material crumbled. Don’t simply refit the fixing into a weakened opening; repair the damage first.
-
Add Backing for Large Holes
Support a large opening before filling it. Holes larger than 4 inches need backing or another firm support, so the patch doesn’t rely on the plasterboard edges alone. Cut back ragged material to a sound shape, then secure a timber support behind the opening. Keep the new support stable and flush enough to hold the replacement board.
- Use a mesh patch for a suitable opening. A self-adhesive mesh patch and joint compound can repair plasterboard holes up to 4 inches. Centre the patch over the opening, then cover it with a thin coat of compound. Feather the edges onto the existing wall, keeping the surface even rather than building a raised ridge.
- Fit board where a patch won’t span the damage. A hole bigger than a golf ball may need a repair patch or a fitted piece of plasterboard. For a large repair, horizontal cut lines 50 mm above and below the damaged area create a neater opening. Secure battens with 40 mm screws, then fasten the replacement board to its support.
- Build a smooth finish gradually. Apply several thin coats of joint compound to a large repair, letting each coat dry before sanding it. Thin coats help prevent ridges and blend the repair into the surrounding wall. Avoid pressing hard with the filling knife, as this can expose the patch edges or damage the paper surface.
- Choose an exterior repair material for brick or render. Use exterior masonry repair mortar for brickwork and a compatible exterior render repair compound for render. Clear loose material from the dish-fixing holes, fill them and finish the surface so it sheds rain. Don’t use interior plasterboard filler on exposed masonry or cracked render.
Treat the cause of a failed wall fixing as part of the repair. Find out why it pulled out before installing a replacement; don’t put another fixing where the cause of failure is still unclear. For medium plasterboard holes, square the edges with a utility knife and remove loose paper before patching. Prepare only the damaged opening by shaping its edges and clearing loose paper. This keeps the repair focused and helps prevent a repeat failure.
A large plasterboard repair can be cut out between two vertical studs, with the cut ending at the centre of each stud. The opening then meets the studs at their centres on both sides. Keep the cut ends at those points so the replacement section has a defined boundary between the studs. This approach applies to a large repair where a piece of board is being fitted, while medium holes can be prepared by squaring their edges and removing loose paper before patching. In either case, identify the cause before replacing a wall fixing that has pulled out.
Using repair patches or replacement plasterboard
Use a patch for an opening that can be supported, or replace the plasterboard if the damage has left a wider gap. A flush, firmly secured repair gives filler and paint a stable base.
Apply Repair Patches or Replacement Plasterboard
Fit a self-adhesive mesh patch over a small opening, or cut replacement plasterboard for a larger gap. Match the board thickness to the existing wall: repair sheets commonly come in 9.5 mm and 12.5 mm thicknesses. Check the patch sits securely and doesn’t flex before covering its edges.
Prime and Paint the Patched Drywall
Let the compound dry fully, then sand it with fine-grade sandpaper until the repair feels level. Apply stain-blocking primer over the patch before painting. Raw joint compound absorbs paint differently from plasterboard, so primer helps create a more even finish.
- Prepare the opening. Remove loose plasterboard paper and debris, then make the edges firm and clean. Wear a dust mask, eye protection and gloves when cutting plasterboard. Keep the opening as compact as possible, since a smaller repair needs less jointing and sanding.
- Measure a small patch. For a small plasterboard repair, cut the patch with an extra 25 mm at the top and bottom. This creates tabs to hold it in place while you position it. Check the patch fits the opening without forcing the surrounding board out of shape.
- Add support where needed. Place horizontal timber supports above and below a small repair. Each support should be slightly longer than the hole, with equal overlap behind the existing board and patch. Secure the supports, then fasten the replacement plasterboard to them with 32 mm plasterboard screws.
- Secure larger replacement sections. If existing vertical studs support the opening, fasten the replacement board to those studs with plasterboard screws. For a large patch, secure the seams over wood support and cover them with paper or mesh jointing tape. Avoid leaving unsupported edges that can move beneath the compound.
- Cover and blend the seams. Apply a thin coat of joint compound over mesh patches and tape. Feather the compound beyond each edge so the repair blends into the wall rather than forming a raised outline. Add further thin coats as needed, allowing each coat to dry before sanding.
- Prepare for paint. Smooth the dry compound with fine-grade sandpaper, then remove sanding dust. Coat the repair with stain-blocking primer before applying paint. Paint only after the primer is ready according to its product instructions, and spread the finish beyond the patch to reduce visible edges.
Matching orange-peel and knock-down textures
Match the wall’s existing texture before painting the repair. Spray-on texture can recreate orange-peel or knock-down finishes, but test your technique on scrap drywall first.
- Identify the finish. Compare the repair with the surrounding wall in clear light. Orange-peel texture has small, scattered bumps; knock-down texture has broader marks with flattened tops. View the wall from different angles, as shadows can make a subtle pattern look deeper.
- Prepare a practice surface. Test spray-on texture on scrap drywall before applying it to the repair. Hold the sample beside the wall to compare the pattern and coverage. Follow the product directions, as nozzle settings and application methods vary.
- Apply orange-peel texture in light passes. Hold the spray evenly and move across the scrap instead of concentrating on one spot. Check how the droplets land. If the sample looks too dense or coarse beside the wall, adjust your technique before treating the repair.
- Create a knock-down pattern carefully. Apply spray texture to the test piece, then follow the product maker’s instructions to flatten the raised peaks. Keep your pressure consistent. Pressing too hard can smear the texture, while uneven contact can make the patch stand out.
- Use suitable equipment for heavier texture. Heavy wall textures may need a hopper gun or joint compound applied with a stomp brush. Test the product and tool on scrap drywall first. Adjust how you load or press the brush until the sample matches the wall, then repeat that motion on the repair.
- Blend the repair into the surrounding pattern. Work from the centre of the patch towards its edges, gradually reducing the texture near the existing finish. Avoid leaving a sharp border. Check the repair from nearby viewing positions and correct isolated bumps or bare spots while the material is workable.
- Let the texture dry before finishing. Follow the product instructions and inspect the patch when it has dried. Check the pattern in ordinary room lighting, not just up close. If it stands out, adjust the patch before priming and painting rather than trying to hide an uneven pattern with extra paint.
Before cutting, scraping deeply or fixing equipment to a wall, consider what may be behind the surface. UK home electrical cables typically run vertically down from switches and sockets and horizontally from them. Bear this in mind when choosing where to work, and don’t rely only on what you can see. If the repair requires opening the wall or driving in a fixing, pause and establish a safe approach first. Take care around the edges of the patch as well as its centre, since texture repairs can extend beyond the visible damage.
Priming, sanding and repainting wall repairs
A neat repair can still stand out if it absorbs paint differently from the wall. Sanding, priming and careful colour matching help the patch blend in.
Sand and Prime the Wall Repair
Once the repair is fully dry, sand it with fine-grade sandpaper, using light pressure across the filler and its edges. Feel for ridges, dips or rough compound, then remove the sanding dust. Apply stain-blocking primer over patched compound, which absorbs paint differently from plasterboard. Let the primer dry as directed before painting.
- Check that the repair is dry. Look for darker, damp-looking areas or soft filler before sanding. Paint applied over an unfinished repair can leave an uneven surface. Follow the filler and primer instructions for drying and preparation, since products vary.
- Sand with a light touch. Move fine-grade sandpaper across the patch and slightly beyond its edges. Keep the sanding even, and stop once the surface feels level. Pressing hard can expose the patch or create a hollow that becomes obvious under fresh paint.
- Remove dust before priming. Wipe the repaired area with a clean, dry cloth after sanding. Dust left on the wall can interfere with a smooth primer coat. Check the edges too, especially where compound feathers onto the original plasterboard.
- Prime the repair. Apply primer across the bare filler and patched area, following the product directions. Stain-blocking primer helps seal the repair and supports an even paint finish. Avoid leaving thick edges or drips, which may show through the topcoat.
Match the Paint or Render Colour
Compare the chosen paint with the existing wall in natural daylight and the room’s usual lighting. On exterior render, match the colour and surface finish, as a smooth patch can look different beside textured render. Apply a small sample to the repair, let it dry and check the match before painting the whole patch.
- Choose a close colour match. Use leftover paint from the original wall if it remains usable. Otherwise, take a clean paint sample or identify the existing colour before selecting a match. Ageing and exposure can change a wall’s appearance, so compare a dried sample rather than relying on a wet coat.
- Blend the paint beyond the patch. Apply the finish evenly, extending it across the repaired area and towards the surrounding surface. Keep the coat consistent to avoid a visible outline. On a larger wall, painting the full surface can help reduce contrast between the repair and older paint.
- Finish exterior render carefully. Select an exterior finish suited to the repaired render, and reproduce its texture before painting. Let the render repair dry as its product directions specify. A colour match alone may not blend if the new surface has a different grain or sheen.
- Inspect the result after drying. View the wall from several angles in daylight and indoor lighting. Check for sanding marks, raised edges or a colour difference. Correct the surface before adding another coat, rather than trying to hide texture defects with extra paint.
Dish Goodbye
Dish Goodbye removes redundant Sky dishes and fills their fixing holes. The quote includes removal of the dish, its bracket and associated cable, plus filling the associated fixing holes. This leaves a tidy starting point for the sanding, priming and painting steps in this guide.
Mention any additional cables, holes or devices in your initial enquiry; they must be quoted separately. Render repairs and painting are also separate from the removal and hole-filling service. Include clear details about the installation and access in your enquiry so the quote can account for the property conditions.
For help with a Sky dish removal, contact Dish Goodbye on 0333 220 2436 or [email protected].
Get the Wall Ready for Its Next Look
Knowing how to fix a wall after a failed dish removal gives you a clear route from exposed damage to a surface ready for decorating. Once the wall is dry and finished, consider how furniture, pictures or lighting will sit against it. A clean, even surface makes it easier to plan the room.
If a redundant dish still needs removing, Dish Goodbye provides satellite dish removal across the UK. Arrange the removal separately from any further decorating so you can plan each step clearly.
Contact Dish Goodbye about dish removal to discuss the next step. You can also call 0333 220 2436 or email [email protected]. Take the project one practical step at a time, and enjoy getting your wall and home back to the look you want.
Frequently Asked Questions
How do I fix a wall mounting that was put in the wrong place?
Remove the mounting and inspect why the fixing failed before choosing a replacement. If the hole is neat and the surrounding wall is sound, use a fixing suited to that wall material. In plasterboard, choose one that spreads its load behind the board. In masonry, a replacement plug may grip with adhesive. If the brick or mortar has crumbled, move the mounting to sound material and repair the old holes separately.