
You can remove an old satellite dish yourself if it’s safely accessible and you can work without risking a fall or damage to your home. When disposing of an old satellite dish, consider whether it or its components can be reused or recycled before throwing it away. The homeowner is responsible for arranging removal of an unused dish from their home.
It’s understandable to want an unused dish gone without causing a leak or leaving loose cables behind. A typical installation has three parts: the dish, its footplate and mounting bracket, and the cables connecting it to the home. Each needs some thought during removal and disposal.
Read on to learn when DIY removal is sensible, when to arrange professional help, how to protect roof fixing points and what to do with the cables. You’ll also find out how to handle the dish and its components for reuse or recycling, so you can clear the exterior safely and leave your home tidy.
Key Takeaways
- DIY removal may suit a dish that’s safely reachable, but working at height can put you and your property at risk.
- Removing the footplate leaves fixing holes that need attention to help protect the roof from leaks.
- Trace exterior cables carefully and consider where they enter the home before deciding what to remove.
- Reuse or recycling can be preferable to sending the dish to landfill; handle its electronic components thoughtfully.
- If the job feels unsafe or complicated, a professional can help remove the dish, bracket and associated cable.
Hiring a professional
Choose professional removal if the dish is difficult to reach, you feel unsure, or the job involves working above ground. A rooftop dish can be awkward to handle while balancing, and a steeply sloped lawn can make a ladder unstable. Don’t climb up to inspect it. From the ground, note the dish’s position, the visible cable route and any access restrictions.
Before arranging removal, describe the property and dish clearly. Mention whether it’s on a roof, chimney, wall or balcony, and explain what access is available. For example, say if a narrow passage blocks access to the rear wall. Height, working space and the condition of the mounting surface all affect how the work can be approached.
Set out exactly what you need removed. A typical installation has three parts: the dish, its footplate and mounting bracket, and the cables connecting it to the home. Explain which parts you want removed. Mention any additional cables, holes or devices in your initial enquiry, as these must be quoted separately.
Agree how the roof or wall will be left after the bracket is removed. Taking off a footplate can expose bolt holes, so ask how the associated fixing holes will be filled and whether separate surface repairs are needed. On a rendered wall, for example, filling a hole is different from repainting the surrounding area. A clear scope helps avoid different expectations about the finish.
Discuss the cable route before work begins. Point out where the cable enters the building and whether it runs along a gutter, fascia or exterior wall. Distinguish the dish’s associated cable from any additional wiring. This helps prevent a visible cable run being left behind or unrelated cables being included without agreement.
Settle disposal arrangements in advance. Ask what will happen to the removed dish and its components, including any electronic parts. If you’d prefer collection, recycling or disposal, ask about these arrangements when requesting a quote. Don’t assume removal automatically includes them or a particular disposal method.
To make the arrangement straightforward, prepare these details:
- Where the dish is fixed and how it can be reached.
- Whether the bracket, associated cable and fixing holes are in scope.
- Any extra cables, devices or holes that need separate attention.
- Your preferred handling of the removed dish and components.
Share clear photographs taken safely from ground level when describing an awkward installation. A view of the whole dish and a closer image of its mounting point can help explain the setup. Leave roof access, removal and repairs to the agreed work plan rather than taking risks to get better pictures.
Preventing roof leaks after removal
A satellite dish’s footplate can leave bolt holes in the roof when removed. These openings need attention because water can enter through damaged or unsealed fixing points. Before removal, identify where the footplate meets the roof covering, such as tiles, slate or a flat-roof surface. This helps establish what needs filling and whether the surrounding material is also damaged.
Once the dish and bracket are removed, deal with the associated fixing holes rather than leaving them exposed. Filling them and repairing any roof damage helps reduce the chance of leaks. Sealing a hole neatly is not a substitute for addressing a cracked tile or damaged roof covering. For example, if a tile has shifted or split around a fixing, the tile itself may also need repair.
Another approach to consider is cutting the mounting bracket just above the footplate. This can avoid disturbing the footplate and its roof bolts, reducing the risk of opening holes through the roof covering. However, the footplate remains in place, so this doesn’t fully remove the installation. Decide whether avoiding roof disturbance or clearing the whole mount matters most.
Use this sequence to plan the work:
- From the ground, note the footplate’s position and the roof surface around it.
- Choose whether the footplate will be removed or left in place.
- After removal, inspect the fixing area for open holes and visible damage.
- Fill the fixing holes and address any damaged roof material.
Don’t treat every fixing point as identical. A bolt through a sound tile creates a different repair need from a fixing beside a cracked tile or damaged flat-roof surface. The roof material and condition around each hole determine the work required. If the footplate stays, the roof holes may remain undisturbed, but the mount will still be visible.
Keep the dish removal and roof repair scope clear. Filling the associated fixing holes is different from repairing wider damage, replacing roofing material or restoring a finish. If you see a separate roof defect, identify it as a separate repair rather than assuming dish removal covers it. This helps set realistic expectations for the finished surface.
For Dish Goodbye’s satellite dish removal, the standard quote covers the dish, bracket and associated cable, plus filling the associated fixing holes. Additional holes or repairs need to be described separately in the initial enquiry. The Dish Goodbye service website explains the removal service and its scope.
Who is Responsible For Removing Satellite Dishes?
The homeowner is responsible for arranging removal of an unused satellite dish from their home. If you own the property, decide whether to remove it yourself or arrange suitable help. For a rented home, involve the landlord or property manager before changing anything fixed to the exterior. This keeps the person responsible for the building informed about work affecting its roof or walls.
To find your local council’s disposal rules, search its official website for “waste and recycling” and “satellite dish”. If the dish isn’t mentioned, use the council’s contact details to ask which local disposal route applies to its materials.
An installer or retailer may take away an old dish if removal is included in the arrangement. Don’t assume that buying equipment or arranging another service includes disposal. Agree who will remove the dish and what will happen to it beforehand.
Before choosing a disposal route, consider whether the dish can be reused. An intact dish might suit a creative garden project, such as a decorative feature, if it can be secured safely and won’t obstruct access. Keep the mounting bracket and loose fixings with it only if they’re also wanted. Don’t leave sharp edges or unstable metal where people could be hurt.
If reuse isn’t practical, look for a recycling route through your council. The dish may contain different materials from its electronic components, so follow the council’s instructions rather than putting the whole assembly into an unlabelled household bin. Include the dish’s mounting parts when explaining what you need to dispose of.
The circuit board needs particular care. Remove it before recycling or throwing the dish away, because it contains toxic elements. Don’t place the board in ordinary rubbish without first following your council’s disposal instructions. Keeping it separate also makes it easier to explain exactly what you’re handing over.
Use this simple decision process:
- Ask whether the dish is wanted for reuse before dismantling it.
- Search your council’s waste pages for instructions covering the dish and its electronic parts.
- Separate the circuit board before disposal, and follow the council’s directions for it.
- Keep the remaining dish and mounting components together if the chosen route accepts them.
Don’t leave an unwanted dish beside a public bin or on a pavement. This doesn’t arrange an accepted disposal route and can leave metal parts where passers-by may encounter them. Instead, agree who is responsible for arranging removal, then use your local council’s guidance to determine how to handle the dish and circuit board.
Removing exterior cables
A redundant dish cable can run from the bracket along a wall, beneath a roof edge or through an exterior opening. Trace its visible route before removing anything. Look for clips, ties and the point where it enters the building. A cable that disappears behind a gutter or into a wall may continue to another room, so don’t pull it just because one end appears unused.
Start indoors. Find the cable’s end and note whether it connects to a receiver, wall plate or other equipment. If you can identify it, disconnect it from the device before dealing with the exterior run. If its purpose or connection is unclear, leave it in place until you understand its route. Cutting an unidentified cable can leave a loose end or remove wiring that is still in use.
Next, decide whether you need the entire exterior run removed or only the section attached to the dish. For example, a cable clipped along a wall may be separate from another wire entering nearby. Follow each visible line individually and don’t assume every cable belongs to the satellite dish. Take a ground-level photo or sketch the route to show where each cable runs.
Removing clips can leave small marks or holes in masonry, timber or trim. A cable-entry opening through an exterior wall is also different from the fixing holes left by a dish bracket. Don’t assume these openings are included in the same repair. Note each location and identify any separate holes or damage that may need attention after cable removal.
Use this checklist before starting:
- Trace the cable from the dish towards its entry point.
- Identify and disconnect its indoor end if you can do so clearly.
- Separate the dish cable from nearby wiring that may serve another purpose.
- Record clips, cable-entry points and any visible surface damage.
- Keep removed cable together for the disposal route you choose.
Don’t climb onto a roof or lean from an upper-floor window to reach a cable. If the cable follows a high roof edge, passes behind a gutter or can’t be traced safely, leave that section alone. A tangled cable can snag on clips or pull against the surface as it comes away. Work only where the cable and its attachment points are safely reachable.
Before arranging removal, describe the cable route and distinguish the dish’s associated cable from any additional wiring. This keeps the requested work clear. Mention cable-entry openings separately from bracket fixing holes. The right approach depends on what the cable serves, where it runs and how it enters the building.
Can You Remove a Satellite Dish Yourself?
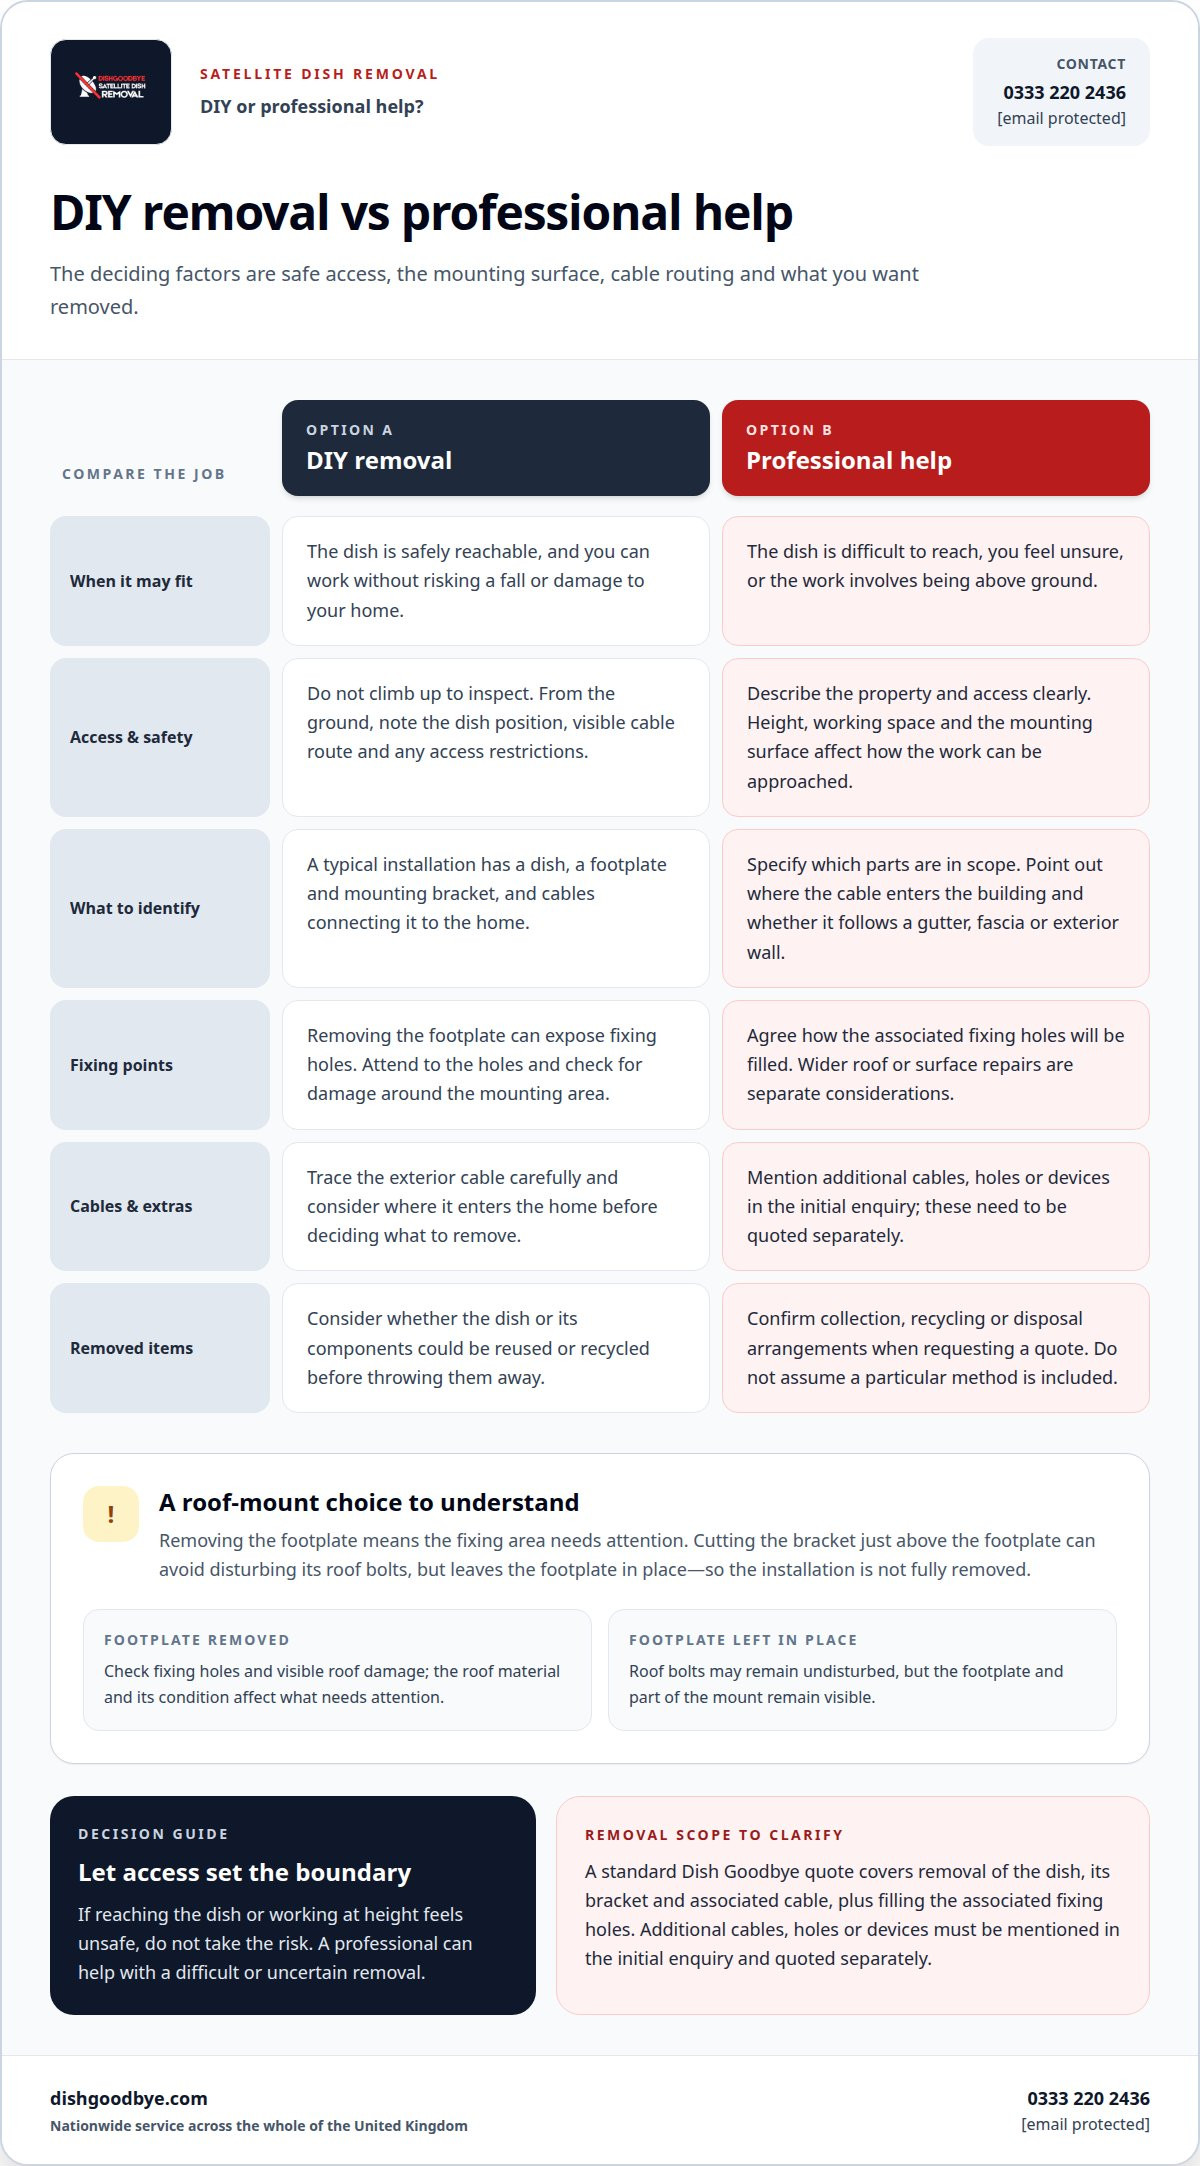
You can remove a dish yourself if it’s safely reachable and the mounting points are accessible without climbing onto a precarious surface. A rooftop dish or one above a steeply sloped lawn creates a fall risk and could damage property. Don’t attempt removal from an unstable ladder or by leaning out of a window. If access feels unsafe, stop and arrange professional help.
A typical installation has three parts: the dish, its footplate and mounting bracket, and the cables connecting it to the home. Decide which parts you intend to remove before starting. The footplate is fixed to the building, so removing it can leave bolt holes that need filling. Removing only the dish won’t clear the whole mounting assembly.
For a safely accessible installation, plan the work in stages. First, identify the cable and disconnect its indoor end if you can do so safely. Then consider how to detach the dish without letting it swing or fall. Keep people clear of the area below, and stop if the dish shifts unexpectedly or the fixings resist removal.
Next, decide what to do with the bracket and footplate. Removing the footplate exposes its fixing holes, which need attention to help prevent leaks on a roof. Alternatively, cutting the mounting bracket just above the footplate can avoid disturbing the roof bolts, but leaves the footplate attached. It’s a trade-off between clearing the entire mount and reducing disturbance around the fixings.
Before beginning, use this decision check:
- Can you reach the dish without standing on a roof or precarious surface?
- Can you handle the dish without it swinging or dropping?
- Have you decided whether the footplate will come away or stay fixed?
- Can you deal with the fixing holes and any visible roof damage afterwards?
If anything raises concern, don’t force the job. A rusted fixing, loose tile or awkward roof edge can turn a simple-looking task into a risky one. Don’t prise at roof materials or leave exposed holes after removing the footplate. The roof surface and condition around each fixing affect what repair is needed.
Self-removal is best limited to straightforward setups that are safely reachable. For a difficult mount or uncertain access, arrange professional satellite dish removal instead of taking a risk on the roof. Make the decision based on the installation’s access, fixings and roof condition.
Dish Goodbye: Sky Dish Removal
Dish Goodbye provides Sky Dish Removal for households ready to clear an unwanted dish without tackling awkward access themselves. It’s a practical option when the dish is difficult to reach, the bracket needs removing, or you want the associated fixing holes filled as part of the work.
The quote includes removal of the dish, its bracket and associated cable, plus filling the associated fixing holes. Additional cables, holes or devices must be mentioned in your initial enquiry and quoted separately. Ask about collection, recycling and disposal arrangements when requesting a quote, so you know how the removed equipment will be handled.
Access, height and property conditions shape the work, so include clear details about the dish’s position and the building. For an unwanted Sky dish, contact Dish Goodbye about removal and describe the job.
Make the next step a safe one
Choose your next step based on access, the roof surface and the parts you want removed. If the dish is safely reachable, plan its removal and disposal carefully. If access feels risky or you’d rather not handle the bracket and cable, professional help can simplify the job. Knowing how to dispose of an old satellite dish in the UK also means deciding what happens to its electronic parts, not just clearing the dish from the wall.
Dish Goodbye provides Satellite Dish Removal and Sky Dish Removal. To discuss a removal, contact Dish Goodbye or call 0333 220 2436. You can also email [email protected]. Describe the dish’s location and the work you need, so the next step is clear. A safer, tidier exterior starts with a practical plan.
Frequently Asked Questions
Can an old satellite dish be recycled in the UK?
Yes, an old satellite dish may be recyclable if a local facility accepts its materials. If you're deciding how to dispose of an old satellite dish in the UK, contact your council and describe the dish, bracket, cable and circuit board separately. Ask whether the facility wants the components separated or kept together. If the dish is still usable, reuse may avoid disposal altogether. Secure sharp edges during storage and transport.
Which parts of a satellite dish can be recycled as WEEE or scrap metal?
Metal parts, such as the dish or bracket, may be accepted as scrap metal, while the circuit board is an electronic component that may need a separate disposal route. Don’t assume the entire installation is accepted as WEEE. Materials and facility rules matter. Describe each part to your council or recycling site, especially the board, so staff can direct it to an appropriate disposal stream.
Can a satellite dish go in household waste or a council recycling centre?
Don’t put a whole dish into household waste unless your council’s instructions explicitly allow it. Before visiting a recycling centre, check whether it accepts bulky metal items and electronic components, and whether you should bring the dish dismantled. Keep the circuit board separate as directed. This helps avoid arriving with a mixed assembly the site cannot accept through the route you expected.
Do UK household waste recycling centres accept satellite dishes, and are there fees?
Acceptance and any fees depend on council and facility rules, so check before loading the dish. Ask whether the site accepts satellite dishes, whether metal and electronic parts need different drop-off points, and whether local booking or access conditions apply. Use your council’s waste pages or contact its waste team for instructions that match your area and the components you’re bringing.
How do I safely remove an old satellite dish from a roof or wall?
Remove a dish yourself only if the fixings and work area are safely reachable from a stable position. Keep people clear below, support the dish before loosening its mount, and stop if the bracket shifts or roof material moves. For a wall-mounted dish, inspect the cable route and fixing surface first. Don’t pull a cable that still enters the home. Leave roof-edge or chimney work to professional help.
Does a satellite dish contain hazardous materials that need special disposal?
The circuit board contains toxic elements, so keep it intact and separate for disposal according to your local council’s instructions. Don’t break it apart or put it loose in ordinary rubbish. The dish and bracket shouldn’t automatically be treated the same way as the board. Ask your council how each part should be sorted before taking them to a disposal site.
Can an old satellite dish be reused, donated or sold?
Yes, a dish in usable condition can be reused, donated or offered for sale if the recipient wants that model and its parts. If you’re considering how to dispose of an old satellite dish in the UK, first ask whether someone can use it. Photograph the dish, bracket and supplied components, then describe their condition honestly. Keep it dry and secure while arranging collection. If it’s damaged or incomplete, recycling may be more practical.