

0333 220 2436 | [email protected]
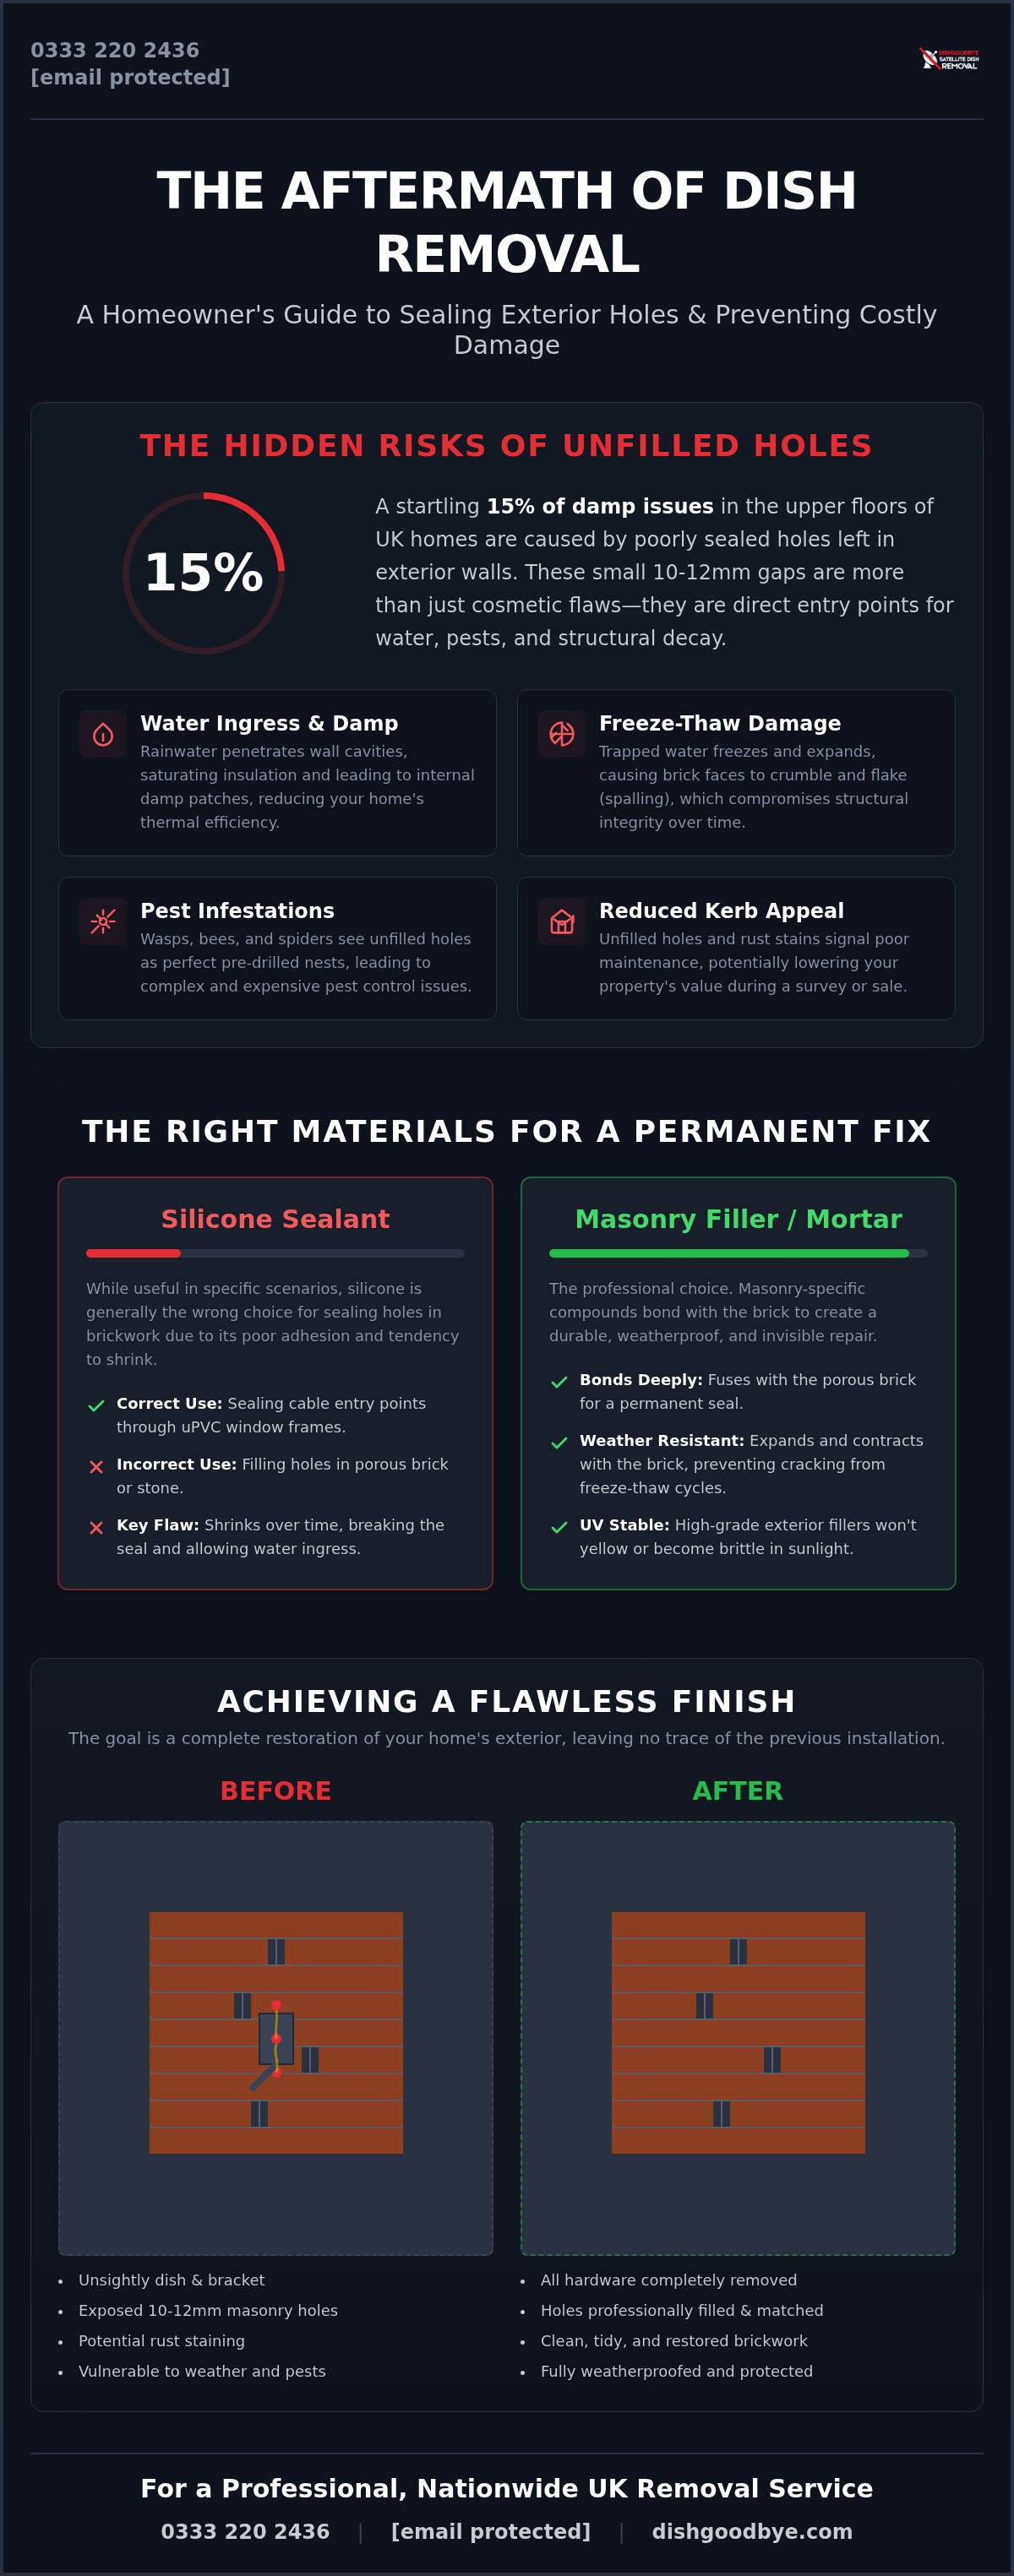
Did you know that roughly 15% of damp issues in the upper floors of UK homes are caused by poorly sealed holes in exterior walls? It is a startling figure that turns a simple home improvement task into a critical maintenance priority. You have finally cleared the clutter from your brickwork, but now you are left wondering exactly what to do with holes after removing sky dish equipment. Those 10mm masonry scars are more than just an eyesore; they are open invitations for water ingress and the damaging British freeze-thaw cycle.
We agree that your home should look its best without the scars of old technology. You want a solution that is durable, invisible, and completely weatherproof. This article shows you how to professionally seal those gaps to prevent structural damp and restore your property’s kerb appeal. We will preview the best materials for the job and explain how to achieve a clean building exterior with zero redundant tech left behind. It is time to enjoy a sleek, well-managed home where the only thing people notice is your beautiful masonry.
0333 220 2436 | [email protected]
Key Takeaways
- Stop structural damp by learning how small masonry gaps allow the British weather to penetrate your home's cavity walls.
- Find out exactly what to do with holes after removing sky dish to avoid unsightly scars and maintain your property's kerb appeal.
- Compare the durability of silicone versus traditional masonry mortar to choose the right weatherproofing material for a permanent fix.
- Master the step-by-step process for extracting old fixings and preparing the surface for a flawless, invisible finish.
- Discover why nationwide professional removal is the safest way to achieve a clean building exterior without the risks of high-level DIY work.
0333 220 2436 | [email protected]
The Hidden Risks of Unfilled Holes in UK Brickwork
Leaving 10mm or 12mm holes in your exterior walls might seem like a minor detail. However, these small gaps act as direct gateways for the harsh British weather to bypass your home's first line of defence. Deciding what to do with holes after removing sky dish brackets requires speed and precision. These openings aren't just cosmetic "scars"; they are structural vulnerabilities that compromise your property's protective envelope. Every minute they remain open, they invite moisture to settle where it doesn't belong.
Water Ingress and Cavity Wall Damp
Driving rain doesn't just run down a wall; it finds every available entry point with surprising efficiency. An unsealed hole allows moisture to travel deep into the cavity, where it saturates your insulation. This often creates internal damp patches that homeowners mistake for expensive roofing leaks. A single unsealed 10mm fixing hole can allow litres of water into a cavity wall over a single UK winter. Once the insulation is wet, its thermal efficiency drops, making your home harder to heat and less comfortable to live in.
Structural Integrity and Masonry Spalling
The real danger lies in the freeze-thaw cycle. Water trapped inside the brickwork expands as it turns to ice, putting immense pressure on the masonry from the inside out. This leads to spalling, which is the crumbling or flaking of the brick's outer layer. It's a progressive problem that eventually compromises the entire face of the brick. If you've left old metal brackets behind, you'll also notice unsightly orange rust streaks bleeding down your render. Repairing these issues usually requires professional Masonry mortar and significant labour, far outweighing the cost of a simple, clean extraction.
It isn't just water that loves these holes. Wasps, solitary bees, and spiders view a 10mm cavity as a perfect pre-drilled nesting site. Once pests establish a colony inside your walls, removal becomes a much more complex and expensive task. For landlords and homeowners, these "brick scars" signal a lack of maintenance to potential tenants or buyers. Neglecting what to do with holes after removing sky dish hardware can lower your property's kerb appeal and even impact valuations during a survey. A clean, smooth exterior suggests a well-managed home and protects your investment for the long term. It's about achieving domestic harmony by removing the clutter and the risks associated with it.
0333 220 2436 | [email protected]
0333 220 2436 | [email protected]
Choosing the Right Materials: Silicone vs. Masonry Mortar
Selecting the right filler is the difference between a permanent fix and a recurring headache. When homeowners ask what to do with holes after removing sky dish brackets, they often reach for the nearest tube of silicone. This is usually a mistake. While silicone is great for bathrooms, it often fails on porous brickwork. It shrinks over time, leaving a tiny gap where water can seep in. Industry experts agree that water infiltration is the most common source of deterioration in external walls. You need a material that bonds for life and mimics the natural properties of your masonry.
When to Use Silicone Sealants
Silicone has its place, but it's limited. It's the best choice for sealing the entry point where cables pass through plastic uPVC window frames. For this task, always select a 'neutral cure' silicone. It doesn't have that sharp, vinegary smell and provides much better adhesion to plastic surfaces. However, avoid using it on brick or stone. Brick is porous, and standard silicone struggles to grip the sandy surface. Over a single winter, the bond can fail, allowing moisture to bypass the seal. This leads to the very damp issues we want to avoid.
The Case for Specialist Masonry Fillers
For the actual brickwork, specialist masonry fillers or a traditional sand and cement mix are superior. These materials are designed to be weather-resistant from the moment they cure. Unlike silicone, which sits on the surface like a plug, masonry fillers bond deeply into the 10mm to 12mm holes left by mounting bolts. They expand and contract at a similar rate to the surrounding brick. This prevents the filler from cracking during the harsh freeze-thaw cycles common in the UK.
When deciding what to do with holes after removing sky dish fixings, remember that the finish depends entirely on your material choice. High-grade exterior polymers are particularly effective because they offer excellent UV resistance. They won't yellow or go brittle under the sun. Achieving a flush, textured finish is the final step to restoring your home's look. You can match the colour of red brick, Cotswold stone, or grey render by mixing pigments into your mortar. For red brick, try mixing a touch of iron oxide pigment. For older stone, a buff-coloured sand often provides the most natural blend.
Professional installers prefer these high-grade materials over basic DIY tubes because they ensure a seamless, invisible repair. If you want to avoid the mess and the guesswork, you can always say 'Dish Goodbye' to those ugly holes by choosing to book a professional removal service to handle the extraction and the filling in one visit. We leave your walls looking clean, clear, and completely restored.
0333 220 2436 | [email protected]
0333 220 2436 | [email protected]
Step-by-Step: How to Seal Holes After Dish Removal
Achieving a professional finish starts long before you open the filler. Most DIY guides skip the preparation phase, but ignoring the dust inside the masonry is a recipe for failure. If you want to know what to do with holes after removing sky dish brackets, start by cleaning the canvas. Use a narrow brush or a can of compressed air to blast out loose masonry dust. Without this step, your filler will bond to the dust instead of the brick, leading to a plug that eventually falls out. It is about creating a clean, high-grip surface for a repair that lasts.
Removing Redundant Fixings and Plugs
Start by extracting the plastic rawlplugs. These are often tucked deep into the 10mm holes and will prevent your filler from bonding deeply. Use a pair of long-nosed pliers or gently screw a wood screw halfway into the plug to pull it out. If a bolt has snapped or rusted into the wall, do not leave it to bleed orange stains onto your masonry. Use a punch to drive it further into the wall or carefully drill it out. Do not forget the 'hidden' entry point where the twin coaxial cables entered your living room. This interior hole requires the same attention as the exterior to prevent draughts and pest entry. If the thought of high-altitude extraction feels daunting, a professional dish removal service can handle these tricky fixings safely and efficiently.
Filling and Texturing for an Invisible Finish
Packing the void is about more than just a surface smear. Use a mastic gun or a small pointing trowel to apply the 'Deep Fill' technique. You must ensure the entire depth of the hole is packed tight. This prevents air pockets that trap moisture and lead to internal damp. For rendered walls, use the 'dab and stipple' method. Apply the filler flush to the wall, then use a damp sponge or an old paintbrush to mimic the surrounding texture. This prevents 'shadowing', where a perfectly smooth repair stands out against a rough-textured wall.
Check your material's curing time before finishing. Most modern exterior fillers are rainproof in 30 minutes but require 24 hours before painting. Matching the colour is the final touch for a truly invisible result. By taking the time to do this correctly, you transform a messy chore into a satisfying property upgrade. You will finally have a clean building exterior that looks like the dish was never there. It is a simple way to reclaim your home's aesthetic and protect your structural integrity in one go.
0333 220 2436 | [email protected]
0333 220 2436 | [email protected]
DIY vs. Professional Removal: Evaluating the Risks
DIY enthusiasts often underestimate the height of a standard UK gable end. While social media tips make the task look simple, the reality involves balancing on uneven ground with heavy tools and a wind-catching metal plate. If you are researching what to do with holes after removing sky dish brackets, you must first consider how you will reach them. Most dishes are positioned high for line-of-sight, often requiring triple-extension ladders that go beyond the reach of standard domestic equipment. The risk of 'ladders on lawns' is real; soft soil can cause a ladder to shift unexpectedly, leading to serious injury.
Working at Heights and UK Safety Standards
Handling a heavy, rusted metal dish while perched on a ladder is a recipe for disaster. One sudden gust of wind can turn that dish into a sail, pulling you off balance in an instant. Professional technicians mitigate these dangers by using fall-arrest gear and industrial-grade ladders with wide stabiliser bars. There is also the potential for property damage. Dropping a metal bracket from two storeys up can easily crack patio tiles, dent guttering, or damage a vehicle parked below. It is much safer to let a professional handle the heavy lifting while you stay safely on the ground.
The Environmental Factor: Responsible Disposal
Once the dish is down, the job isn't finished. Old satellite hardware and coaxial cables are classified as Waste Electrical and Electronic Equipment (WEEE) under UK law. This means they cannot be thrown into your domestic bin. Professional services ensure that satellite dish recycling is handled correctly. We provide a zero-landfill promise, ensuring 100% of the metals and e-waste are processed at specialist recycling facilities. This responsible approach keeps your conscience as clean as your brickwork.
Professional removal requires more than a basic screwdriver. We use SDS drills to extract stubborn fixings and specialist reach equipment for difficult angles. For landlords, professional sealing provides essential peace of mind. It ensures the repair is weatherproof and won't lead to future damp claims from tenants. Knowing what to do with holes after removing sky dish hardware is only half the battle; ensuring the removal itself is safe and legal is just as vital. If you want a flawless finish without the risk of a fall, book your nationwide satellite dish removal today. We leave your home looking organized, forward-thinking, and completely free of redundant tech.
0333 220 2436 | [email protected]
0333 220 2436 | [email protected]
Say 'Dish Goodbye' for a Flawless Exterior Finish
Reclaiming your home's character starts with dismissing the redundant tech that clutters your walls. Dish Goodbye offers a comprehensive nationwide service designed to handle every stage of the extraction process. We don't just take the dish down; we restore the surface beneath it. This complete restoration approach solves the problem of what to do with holes after removing sky dish brackets by providing a professional, weather-tight seal that blends perfectly with your masonry. It is a simple, low-effort way to achieve domestic harmony and efficiency.
Our "extract and fill" promise is the foundation of our service. We remove every bracket, bolt, and clip, leaving nothing behind but a clean, smooth surface. For homeowners and landlords alike, this means an immediate boost in property value and protection against the damp issues discussed earlier. You can finally enjoy a building exterior that is free from the 'scars' of previous installations. It is a lifestyle upgrade that prioritizes your comfort and your property's long-term health. We transform a state of disorder into one of absolute cleanliness.
Our National UK Service Standards
We pride ourselves on being a reliable authority in satellite dish removal. Our professional technicians are available across the entire United Kingdom. We travel to you, wherever you are located, ensuring that distance is never a barrier to a clean home. Every member of our team understands the nuances of masonry health and property protection. We use the specialized fillers and techniques required to improve curb appeal while ensuring your walls remain weatherproof. Our goal is to transform a frustrating household chore into a seamless, satisfying experience.
Get Your Quote Today
Ready to see the difference? You can reclaim your property's aesthetic in just a few simple steps. Call us directly on 0333 220 2436 to discuss your removal needs with a friendly, helpful expert. Alternatively, you can email photos of your redundant hardware to [email protected] for a fast, accurate response. We make it easy to understand what to do with holes after removing sky dish equipment by handling the entire job for you, from extraction to the final texture match.
The result is a clean, smooth brickwork finish with no visible wires, brackets, or redundant fixings. Your home will look exactly as it should: organized, forward-thinking, and completely clear of obsolete technology. Say 'Dish Goodbye' today and experience the relief of a truly flawless exterior finish. It is the definitive break from past frustrations that your home deserves.
0333 220 2436 | [email protected]
0333 220 2436 | [email protected]
Reclaim Your Home’s Flawless Exterior
Restoring your masonry is about more than just aesthetics; it is about essential structural protection. We have explored how unsealed gaps lead to cavity wall damp and why specialist masonry fillers outperform basic DIY solutions. Knowing exactly what to do with holes after removing sky dish hardware is the key to long-term property health. You don't have to settle for unsightly "brick scars" or risk the dangers of working at height on a ladder. A clean, smooth finish is just one step away.
Our UK-wide expert technicians provide a complete solution that includes professional masonry filling and a zero-landfill recycling guarantee. We handle the heavy lifting and the technical sealing so you can enjoy a home that feels organized and refreshed. It is time to simplify your maintenance routine and achieve the domestic harmony you deserve. Book Your Professional Dish Removal and Hole Repair Today and see how easy it is to transform your property. Say goodbye to redundant tech and hello to a beautiful, weatherproof home.
0333 220 2436 | [email protected]
0333 220 2436 | [email protected]
Frequently Asked Questions
How do you fill holes in brickwork after removing a satellite dish?
You should use a high quality masonry filler or a sand and cement mortar mix. Start by clearing out any dust or debris from the 10mm opening to ensure a strong bond. Pack the material deep into the void using a small pointing trowel or a mastic gun. This ensures the entire cavity is sealed rather than just the surface. For a seamless finish, stipple the damp filler with a brush to match the surrounding brick texture.
Will leaving holes from an old Sky dish cause damp in my house?
Yes, unsealed holes are a common cause of damp in UK homes. Driving rain enters these 10mm to 12mm gaps and can saturate your cavity wall insulation. This leads to internal damp patches and cold spots that are often difficult to diagnose. When people ask what to do with holes after removing sky dish brackets, the answer is always to seal them immediately to prevent long term structural erosion and moisture ingress.
What is the best sealant for holes in exterior walls?
The best sealant is a dedicated exterior masonry repair filler or a high grade exterior polymer. These materials are designed to expand and contract with the brickwork during the British freeze-thaw cycle. Avoid using standard bathroom or window silicone on porous brick surfaces. It often shrinks and pulls away from the masonry over time. Professional grade fillers provide a UV resistant, weatherproof seal that maintains its integrity for years without cracking or failing.
Can I just paint over the holes left by satellite brackets?
No, you cannot simply paint over these holes. Masonry paint is not designed to bridge gaps of 10mm or more. The paint will eventually sag, crack, or peel, leaving the hole exposed to the elements once again. You must fill the hole with a solid material like mortar or masonry filler first. Once the repair has cured completely, you can then apply paint to make the fix invisible and match your existing wall colour.
Do I need to remove the plastic wall plugs before filling the holes?
You must remove the plastic rawlplugs to achieve a professional result. Leaving them in place prevents the filler from bonding deeply with the brickwork, which can lead to the plug falling out later. Use long nosed pliers to pull them out or gently drive a screw into the plug to gain purchase. Removing the fixings ensures a clean cavity that can be packed tightly with weatherproof material, resulting in a much more durable repair.
How much does it cost to have a satellite dish professionally removed and the holes filled?
Professional removal costs depend on several factors like the height of the dish and the accessibility of your property. Every home is different, so we recommend getting a tailored estimate. You can contact us directly to discuss your specific requirements. Our service includes the complete extraction of all brackets and fixings, followed by specialist masonry filling. We also provide a guarantee that all removed metal and electronic waste is processed through approved recycling centres.
Is it safe to remove a Sky dish myself if I have a ladder?
Removing a dish yourself involves significant safety risks. Satellite dishes are often mounted at height, requiring industrial grade ladders and fall arrest gear for safe access. Handling a heavy, rusted metal dish while balanced on a ladder is dangerous, especially in windy conditions. If you are unsure about what to do with holes after removing sky dish equipment safely, it is better to hire a professional who has the right tools and safety training for the job.