

A lasting-looking repair starts with the wall, not the filler. For satellite dish removal across the UK, contact Dish Goodbye at 0333 220 2436 or [email protected], or visit dishgoodbye.com. If you’re filling satellite dish bolt holes yourself, the right approach depends on whether the exterior is brick, mortar or render. Choosing an unsuitable material or skipping preparation can leave a rough patch or an opening where rain may enter.
A tidy repair depends on careful preparation and a filler suited to the surface. This guide explains how to inspect and clean fixing holes, choose a suitable repair material, and fill and finish the surface to suit the surrounding wall. It also covers when removing the dish, brackets, fixings and redundant cabling as part of the same job may be more practical.
Dish Goodbye removes redundant satellite dishes, brackets, fixings and cabling, then fills and smooths the fixing holes. For UK-wide service information, call 0333 220 2436 or email [email protected].
Key Takeaways
- Match the repair approach to the wall surface, whether it’s brick, a mortar joint or render.
- Exposed fixing holes can allow moisture to reach the wall, so inspect and prepare them before filling.
- Filling satellite dish bolt holes won’t remove a dish or attached brackets, so decide whether you need a repair or complete removal.
- Follow the repair material’s instructions, then finish the filled area to suit the surrounding wall.
- Dish Goodbye removes redundant dishes, brackets, fixings and cabling, then fills and smooths the fixing holes.
Why filling satellite dish bolt holes matters for your exterior wall
Satellite dish bolt holes are the openings left in a wall after the dish brackets and mounting fixings have been removed. Exposed exterior fixing holes should be assessed and filled because they can provide a route for moisture into the wall, although water ingress or damp isn’t inevitable.
Filling satellite dish bolt holes is about more than appearance. Before choosing a repair, inspect the material around each opening. Loose or crumbling masonry, cracks, staining or changes to the surrounding finish may mean a simple surface patch won’t address the full issue. These signs aren’t a diagnosis. If damage appears to extend beyond the fixing holes, have the wall assessed rather than covering it over.
What can happen if exterior fixing holes remain open?
Rain may enter exposed openings, particularly if water collects around a fixing or the wall is already cracked. This is a risk, not a guarantee of damage. Look for loose masonry, fragments of mortar, visible cracks or staining near the holes. If mortar joints are deteriorated more widely, the repair may need to address the joint itself. The process of repointing involves renewing mortar joints, rather than simply covering their surface.
Does every satellite dish hole need the same repair?
No. A small, sound opening is different from a large, uneven hole or one surrounded by damaged material. Brick, mortar joints and render also have different textures and finishes, so a repair that looks acceptable on one surface may stand out on another. Assess both the hole’s size and condition and the existing wall finish before choosing how to prepare and repair it.
For a hole in a brick face, consider how the patch will look against the brick and surrounding joints. For a hole in a mortar joint, check the condition and appearance of the mortar. On render, the repair should follow the surrounding surface rather than leave a ridge or dip. Don’t use filler to hide crumbling masonry or cracks that need broader attention. Start by assessing the wall, then choose the repair.
Choose a suitable repair for brick, mortar or rendered walls
Choose a repair material to suit both the wall and the condition of the hole. A neat result means more than covering the opening: the repair needs to suit the surface beneath it and sit naturally against the surrounding texture and finish.
Use this comparison as a starting point. Check the repair material’s packaging to confirm it is intended for the surface, and follow its preparation and application instructions.
| Wall surface | What to consider | Repair approach |
|---|---|---|
| Brick face | Is the opening in the brick itself, and are its edges sound? | Choose a repair material suitable for exterior masonry. Consider how its colour and texture will look against the brick. |
| Mortar joint | Is the fixing hole in the joint, or is the surrounding mortar loose or worn? | A mortar-based repair may suit a hole in a mortar joint. Remove loose material first, and don’t simply cover a joint that needs wider repair. |
| Rendered surface | Is the render smooth, textured or uneven around the opening? | Use a repair material intended for the surface and work towards a finish that blends with the existing render. |
What should you consider when repairing brick and mortar?
A hole in a brick face isn’t the same as one in the mortar between bricks. The repair needs to suit the material being filled, and a generic filler or colour may stand out against the wall. Before applying anything, carefully clear loose fragments from around the opening. Applying a repair over unstable material can leave an unsound or untidy finish. If the surrounding mortar is deteriorated beyond the hole, a small patch may not address the wider area.
How does filling a hole in render differ?
Render can be smooth or textured, so the patch needs to follow the finish around it. Even a small repair may remain visible if it dries with a different texture or shape. Check that the product is suitable for the rendered surface, prepare the opening as directed and follow the manufacturer’s application instructions. Take care when smoothing: a flat patch on textured render can stand out.
When filling satellite dish bolt holes, assess the surface and opening before selecting a repair material. If the dish is still attached, complete removal addresses the dish, brackets, fixings and cabling together. Learn about satellite dish removal and the fixing-hole filling included with Dish Goodbye’s UK-wide service.
DIY filling or complete dish removal: compare the practical options
Filling the holes and removing the dish are separate tasks. A repair-only job can tidy openings after the equipment has been safely removed, but it won’t take down a dish, detach its brackets or clear redundant cabling. If any part of the installation is still fixed to the wall, plan how it will be removed safely before starting the repair.
For a closer look at what a complete job involves, read Professional Dish Removal Service: Protecting Your Property from Redundant Tech.
When might a homeowner consider filling holes themselves?
DIY may suit small, accessible holes when the dish and all attached fixings have already been safely removed. Before starting, consider whether you can reach the wall securely, whether the surrounding brick, mortar or render is sound, and how you’ll match the existing finish. If access feels unsafe, don’t attempt the work from a roof or an unstable position.
Pause if the opening is extensive, the masonry is loose, or cracks and other damage extend beyond the fixing point. Filling over damaged material may conceal the visible opening without addressing the underlying condition. Assess the surface and hole before choosing a repair approach.
What does a complete removal-and-repair service address?
A complete service deals with the redundant installation as well as the wall openings. Dish Goodbye removes the dish, brackets, fixings and redundant cabling, then fills and smooths the fixing holes. Addressing these elements together avoids leaving equipment or cabling attached elsewhere on the exterior while repairing only the visible holes.
Removed metal and electronic waste is processed through approved recycling centres. Dish Goodbye provides this service across the United Kingdom, bringing removal and making-good together as one coordinated job.
As a simple guide, if the equipment is already safely off and the holes are small with sound material around them, a repair-only approach may be suitable. If the dish or brackets remain in place, filling satellite dish bolt holes alone won’t complete the job. Explore professional dish removal and hole filling for a joined-up approach.
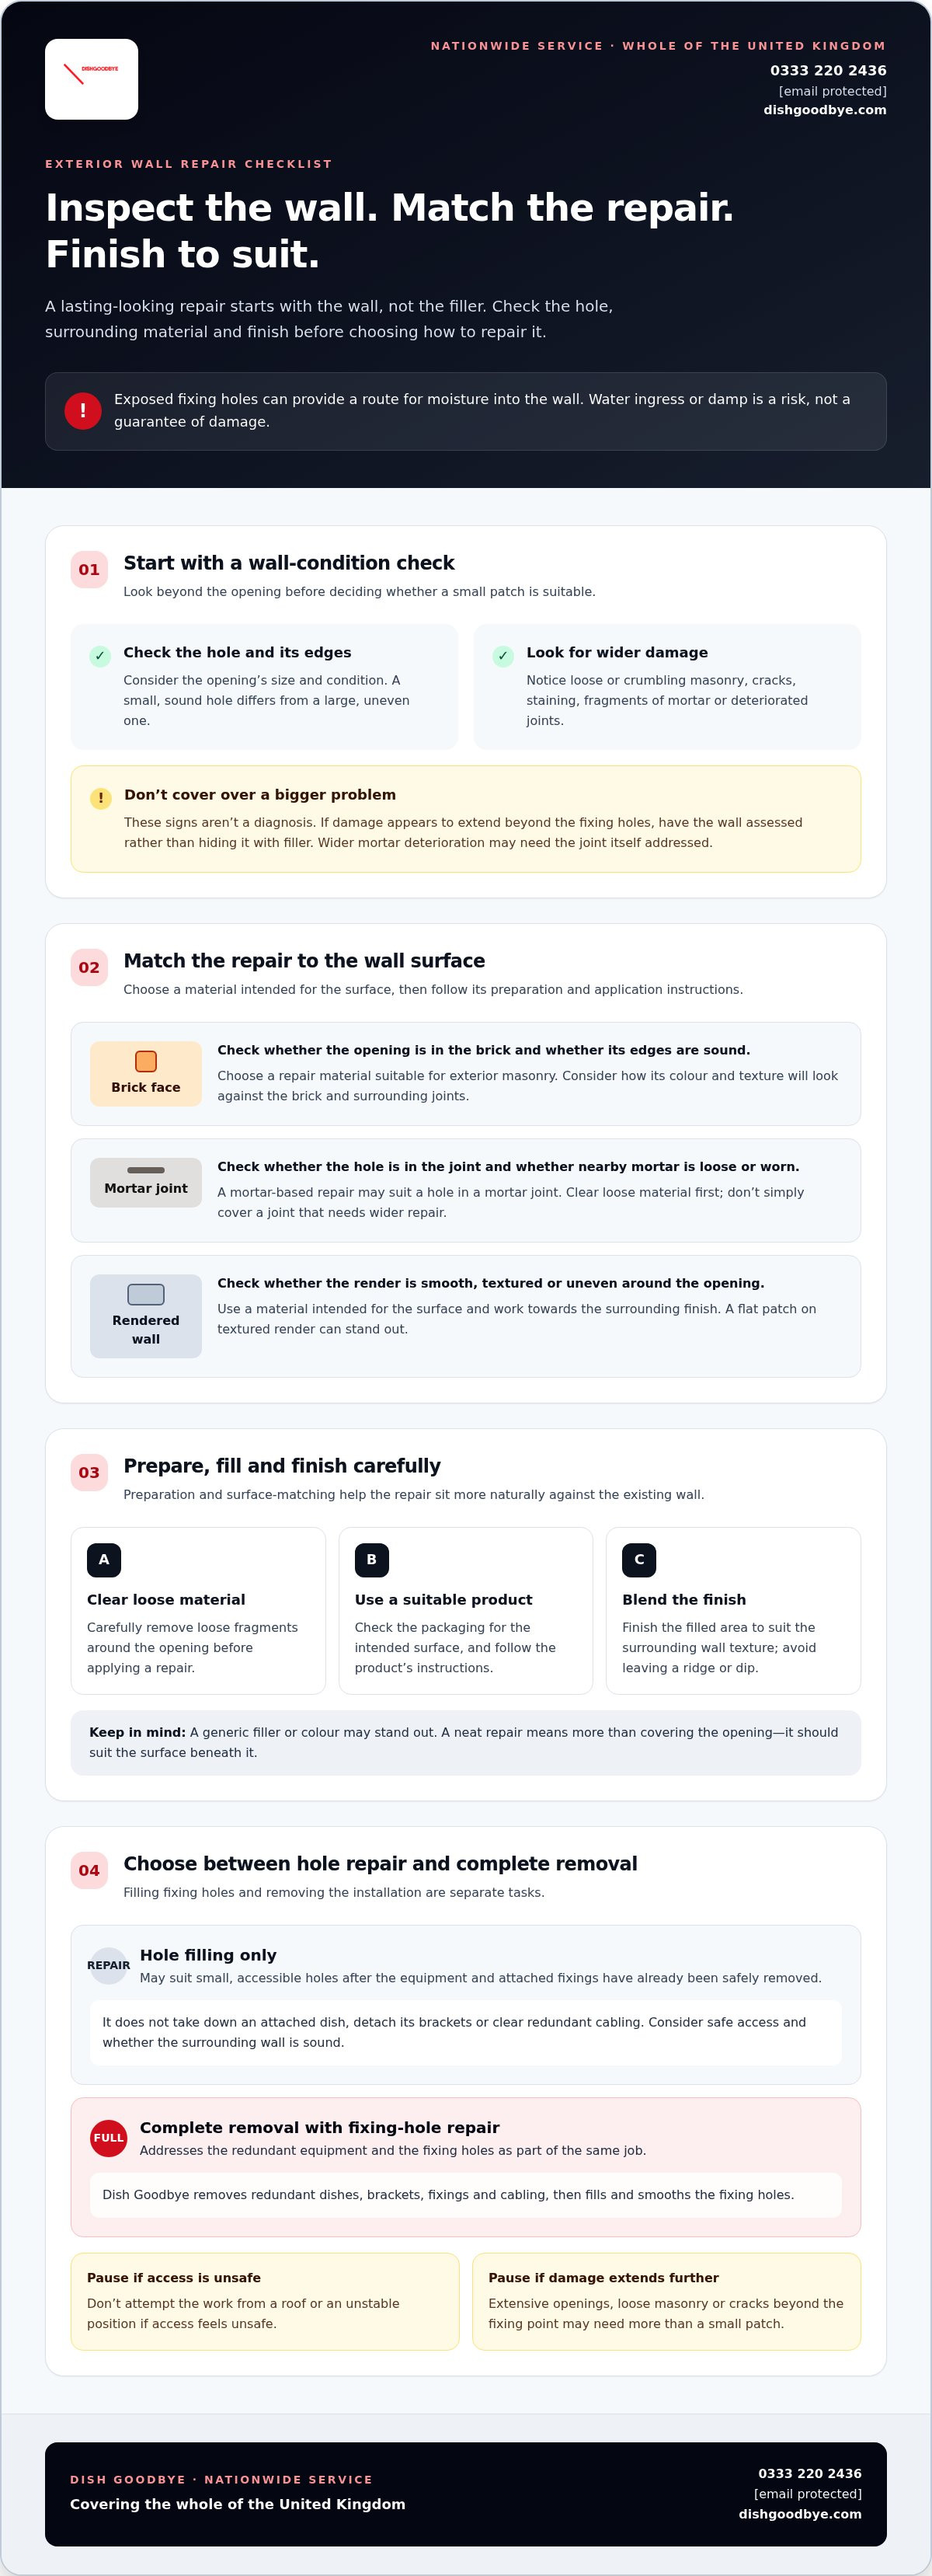
How to prepare, fill and finish satellite dish bolt holes
A tidy repair starts before you open the filler. Inspect the hole, prepare the surface, fill according to the chosen material’s instructions, then finish to suit the wall. Inspect, prepare, fill and finish, in that order. This sequence helps you spot problems early and gives the repair a better chance of looking neat while keeping the opening covered.
How should you prepare the opening before filling it?
First, look closely at the hole and the material around it. Check for loose masonry, crumbling mortar, cracks or an opening that’s larger than it first appeared. If the wall looks damaged beyond the fixing point, pause rather than covering it with filler.
Carefully remove loose dust and fragments without scraping away sound brick, mortar or render or making the hole bigger. The aim is a clean, stable surface, not an enlarged opening. Preparation can vary by repair material, so follow the product instructions for the surface, including any directions for preparing or dampening it. Don’t assume the same method suits every filler.
How can you make the finished patch blend in?
Apply and shape the repair material as its instructions direct. A hole in a mortar joint may need a different finish from one in a brick face, while render may have a smooth or textured surface to match. Follow the surrounding contours rather than leaving a raised edge or hollow. Colour and texture matter too, but an exact match may not be possible, particularly where the wall has weathered.
Let the material set as directed before judging the result or applying any further finish. Then inspect the patch in good light. Check that it sits neatly against the wall and that the opening is covered, with no obvious gaps or loose edges. A smooth appearance matters, but so does filling the fixing point properly. If the repair has cracked, pulled away or exposed damage around it, don’t simply disguise it with another surface layer.
When filling satellite dish bolt holes, match your preparation and finishing to the wall, not just the size of the opening. If you’d prefer the redundant dish, brackets, fixings and cabling removed as part of the job, arrange satellite dish removal and hole filling with Dish Goodbye. The service covers the UK and includes filling and smoothing fixing holes.
Get the dish removed and fixing holes filled in one visit
For UK-wide satellite dish removal, contact Dish Goodbye on 0333 220 2436 or email [email protected].
If a redundant dish is still attached, dealing with the equipment and the wall together can make exterior tidying more straightforward. Dish Goodbye’s nationwide service covers the whole of the United Kingdom and includes removal, fixing-hole filling and smoothing. It also addresses the brackets and cabling, not just the marks left behind.
What does Dish Goodbye handle during removal?
The work involves dismantling and removing the redundant satellite dish, taking away its brackets and fixings, and removing associated cabling. The fixing holes are then filled and smoothed to help leave a neater exterior.
This joined-up approach matters because filling satellite dish bolt holes alone won’t remove attached equipment or redundant cables. Clearing the installation leaves the outside of the property tidier, while the repair addresses the openings left by the fixings. Removed metal and electronic waste is processed through approved recycling centres.
Taking away redundant equipment and addressing the fixing holes as part of the same job can make it simpler to tidy the exterior.
What should the reader do next?
If you’d rather not handle removal and making-good as separate tasks, explore Dish Goodbye’s nationwide satellite dish removal service. The service deals with the dish, brackets, fixings, redundant cabling and resulting holes together.
For satellite dish removal and fixing-hole filling across the UK, call 0333 220 2436 or email [email protected]. Visit dishgoodbye.com to learn more.
Leave your exterior tidy and protected
A lasting repair starts with the wall: assess the surface and hole, prepare carefully, then choose a suitable material and finish. Filling satellite dish bolt holes can cover exposed fixing points, but it won’t remove a dish, brackets or redundant cabling that are still attached.
Dish Goodbye handles the complete job across the UK, removing redundant dishes, brackets, fixings and associated cabling, then filling and smoothing the fixing holes. Removed metal and electronic waste is processed through approved recycling centres, clearing the exterior and leaving a neater finish.
Ready to deal with the equipment and wall together? Arrange nationwide satellite dish removal and hole filling with Dish Goodbye.
Call 0333 220 2436 or email [email protected].
Frequently Asked Questions
Can I fill satellite dish bolt holes myself?
Yes, if the dish and fixings have already been safely removed, the holes are accessible and the surrounding wall is sound. Carefully clear loose debris, then choose a repair material suitable for the surface and follow its instructions. Don’t attempt removal from an unsafe position or fill over crumbling masonry, extensive cracks or a large damaged opening. If you’re concerned about the wall’s condition, pause and have it assessed before covering it.
What is the best filler for satellite dish bolt holes in a brick wall?
The suitable material depends on whether the hole is in the brick face or a mortar joint, as well as the hole’s size and condition. For a small, sound opening, use an exterior repair material labelled as suitable for masonry. A hole in a mortar joint may call for a compatible mortar-based repair. Remove loose material first, and check the product instructions rather than assuming one filler or colour suits every brick wall.
How do you fill a bolt hole in a rendered wall?
Start by checking that the render around the opening is stable. Carefully clear away loose material without enlarging the hole, then use a repair material suitable for the rendered surface and follow its preparation and application instructions. Shape the patch to follow the surrounding render, whether it’s smooth or textured. A small repair may still be visible if the texture or appearance differs, so assess the finish once the material has set as directed.
Can water get through old satellite dish holes?
Yes, exposed fixing holes can allow rain or moisture to reach the wall, though this doesn’t mean damp or damage will always follow. Check for loose masonry, cracks, staining or other visible changes around the openings. These signs don’t confirm a cause on their own, but they may mean a simple surface fill isn’t enough. Have the hole assessed and fill it with a repair material suited to the wall.
Should I remove the satellite dish before filling the holes?
The dish and brackets need to be removed before you can properly fill the fixing holes behind them. Don’t try to fill around attached equipment: the fixings remain in place, and the holes they cover won’t be addressed. Dish removal can involve working at height, so don’t attempt it if access or the equipment makes the task unsafe. Once removal is complete, inspect the exposed holes and surrounding wall before repairing them.
How do I make a filled satellite dish hole match the wall?
Choose a repair material that suits the wall and aim to match its texture and finish as closely as practical. Brick faces, mortar joints and render look different, and weathering can make an exact colour match difficult. Follow the material’s instructions for filling and finishing, then assess the patch once it has set as directed. A well-shaped patch can still show a slight difference.
Can Dish Goodbye fill the holes left by a satellite dish?
Yes. Dish Goodbye’s UK-wide satellite dish removal service includes filling and smoothing the fixing holes left behind. The team removes redundant dishes, brackets, fixings and associated cabling, then fills the holes as part of the work to help leave the exterior neater. Removed metal and electronic waste is processed through approved recycling centres. This is a practical option if you want the equipment removed and the fixing points addressed together.